


Table of contents
Hey there, fellow web developer! We all love deploying our Fullstack applications on platforms like Netlify, Vercel, Render, and others, right? But have you ever stopped to wonder, "How does it actually happen?" Well, I did! In this blog, I'll break down the deployment process for a React.js application. And guess what? Deploying an Express.js application is pretty similar too!
The Aha Moment: Ever noticed those logs while deploying your app? I was blown away! It turns out, the platform does pretty much the same steps, what we manually do to run our app. Let's unravel the magic behind these deployments and see what's really going on behind the scenes. Stick around as we explore the simple yet fascinating process of turning your code into a live, accessible application.
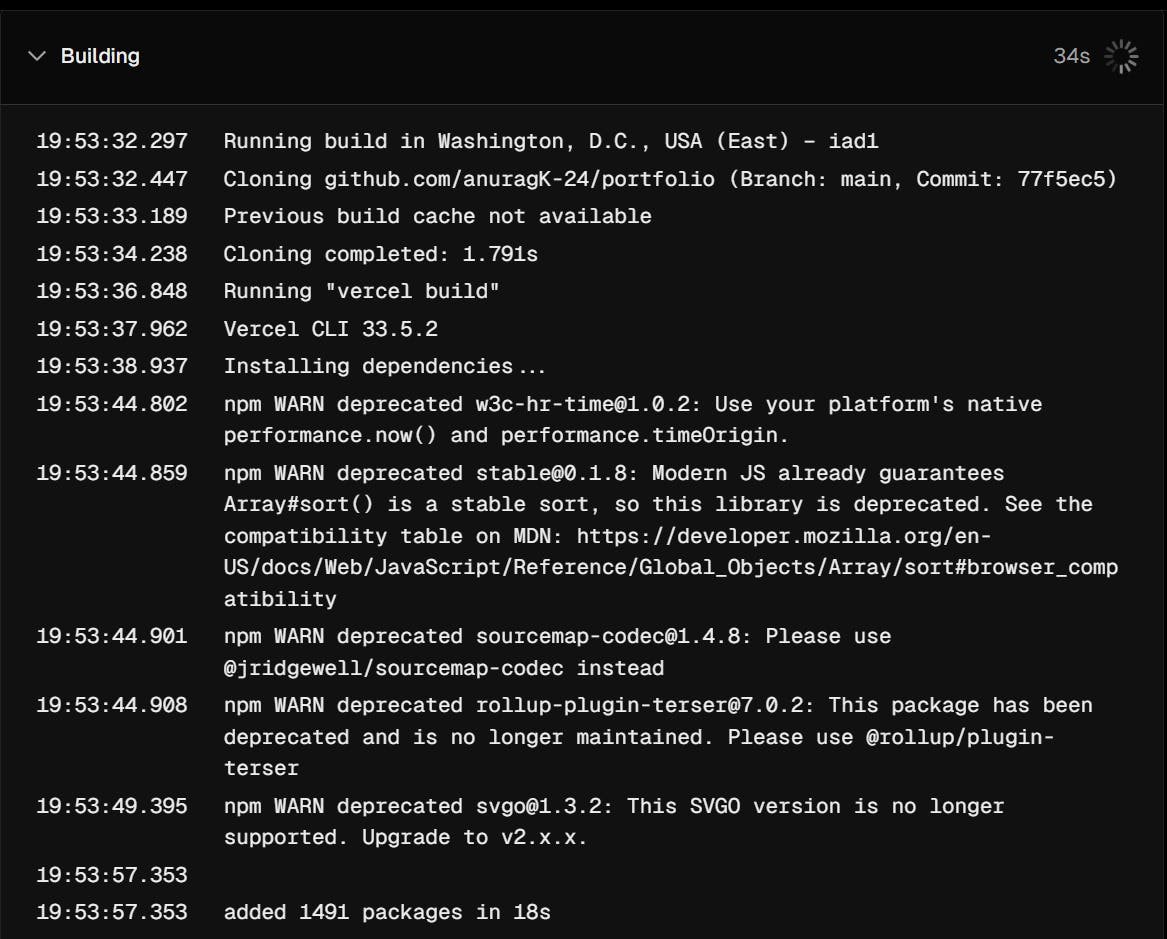
Logs of deploying React.js application
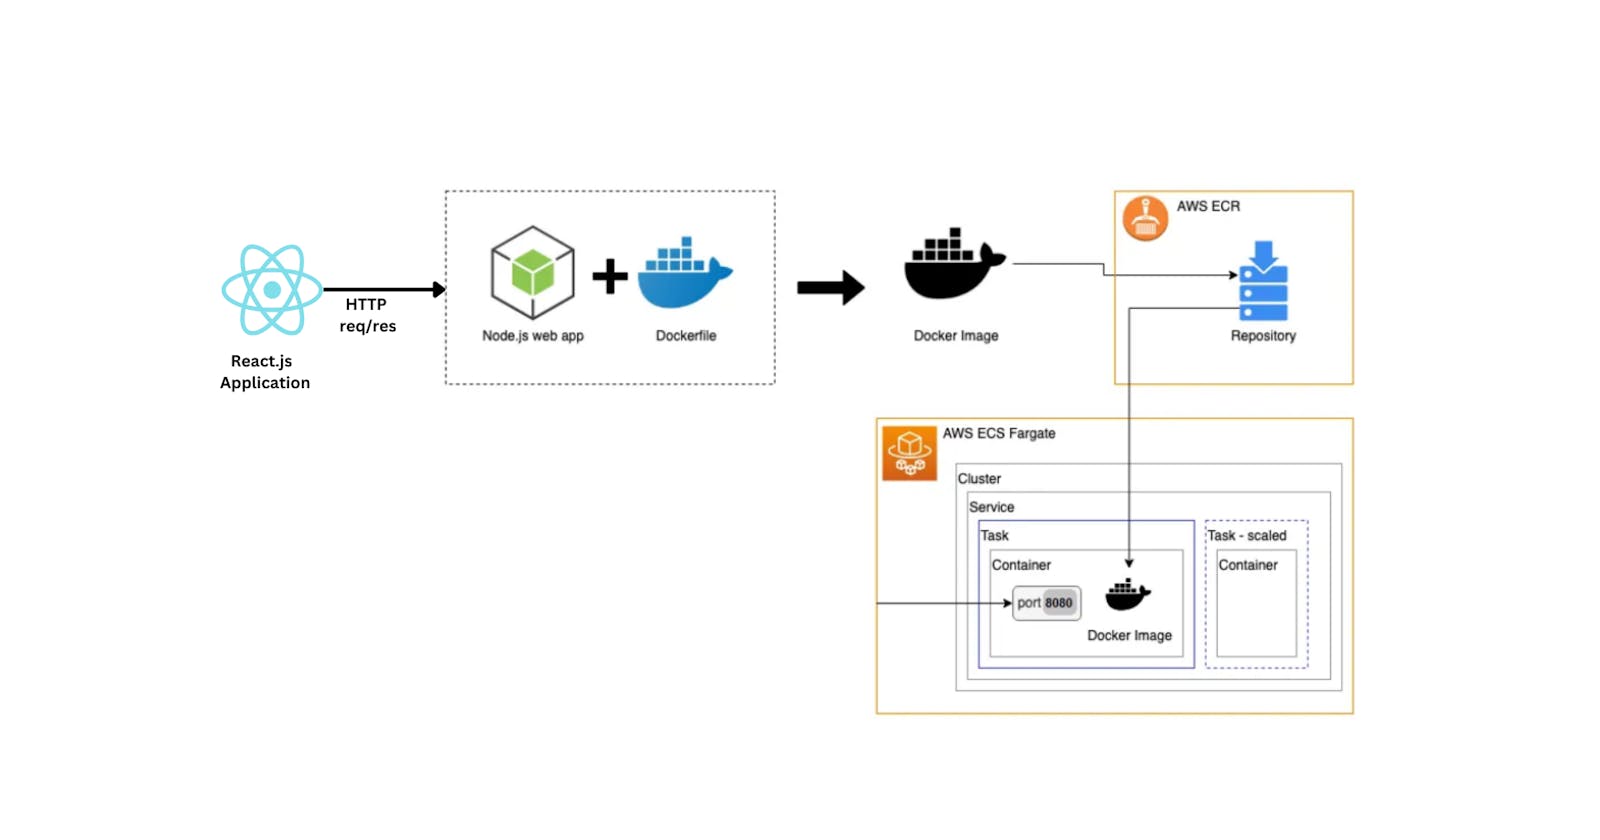
How the platform deploys the application by taking input the Github link from the user, then clone the code and deploy the application automatically, and assign the domain to the application (Creating the deployment pipeline).
System Architecture
We are taking some services like the
API Server -> We use Node.js server which will handle all the HTTP RESTful APIs.
e.g., Cloning the project, Deploying the project
Instead of cloning the code on the API Server, we'll use the Docker Container (Isolated Environment).
We'll use the Docker Orchestration service (AWS ECS)
Whenever a user requests to deploy the application whose code is on the Github, we'll spin up a container Dynamically. We'll pass the information to the container which will be running on the AWS ECS by telling which code we want to build by providing the Github URL.
The container will clone the code in its isolated environment from GitHub. Here by using the Container to keep the project, we can achieve parallelism by spinning up multiple containers at once. This will help in the scaling of the application. These containers will securely build the code in the isolated environment.
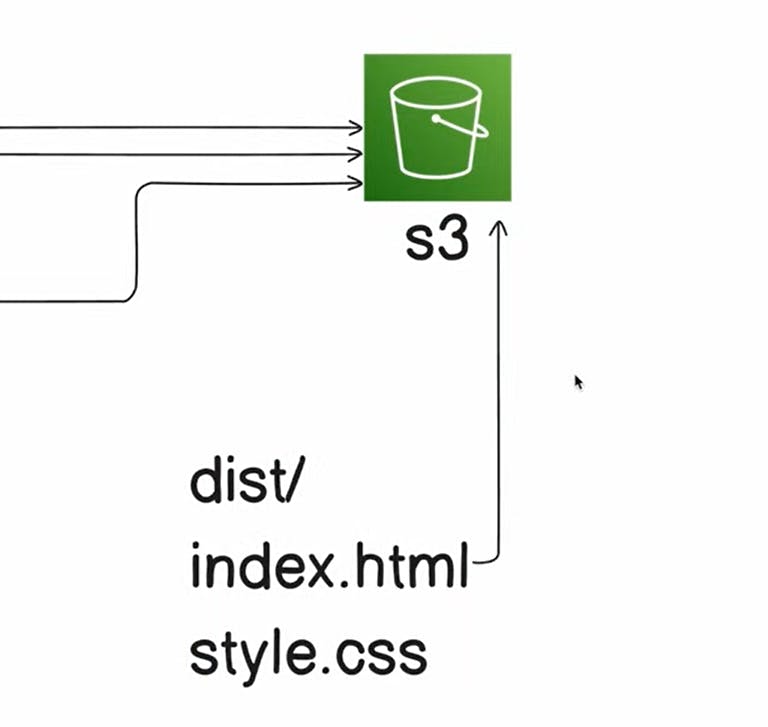
After that, we use the central storage service S3 (AWS S3 bucket) to stream the build (output folder) output code in it. These containers will self-destroy after putting the output in the S3, to lower the computation power.
Procedure to build our own deployment application
Initially, we design an API server, which is an express.js API server. Which will help in Handling HTTP request.
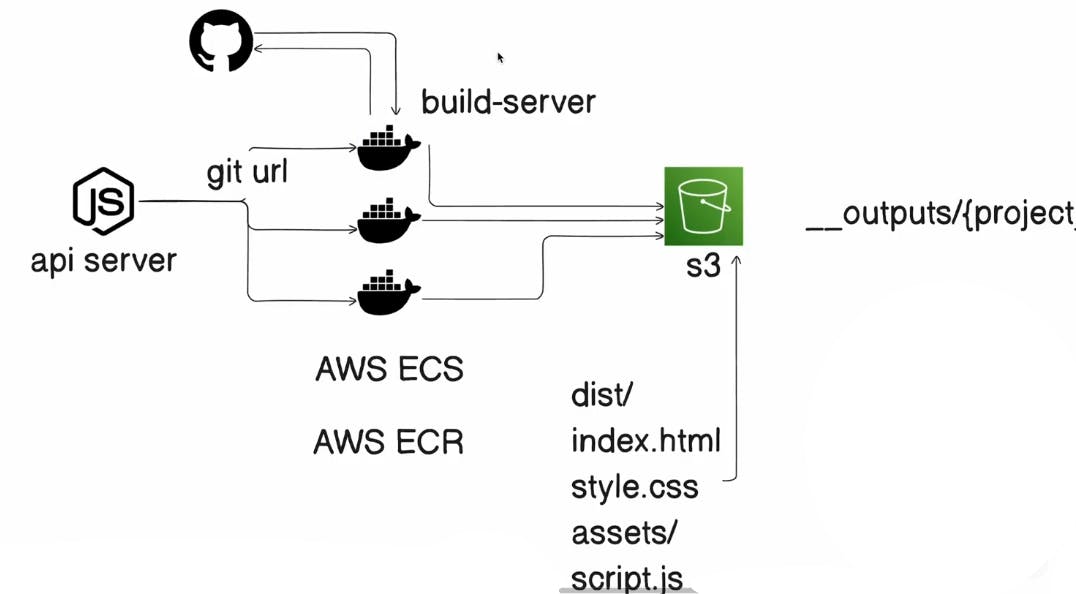
These containers are the build-server.
Dockerfile
These containers -> named build-server -> Dockerfile -> it'll be used to build the docker image for the build server
To know more about Docker, or the relation between Dockerfile and Docker Image Click Me.
Note :- Don't get overwhelmed by seeing the length of the code, the following code contains lots of comment.
# it'll be used to build the docker image for the build server
FROM ubuntu:focal
# Above will be used to pull the ubuntu base image from docker hub

RUN apt-get update
# Above will update the package list of the ubuntu image
RUN apt-get install -y curl
# Above will install curl package in the ubuntu image
# curl will be used to download the nodejs package - for API call to the nodejs server
# cURL (Client URL) is a command-line tool that allows data transfer to or from a server without user interaction using the supported libcurl library.
RUN curl -sL https://deb.nodesource.com/setup_20.x | bash -
# Above will download the nodejs package from the nodejs server

RUN apt-get upgrade -y
# Above will upgrade the packages in the ubuntu image


RUN apt-get install -y nodejs
# Above will install the nodejs package in the ubuntu image

RUN apt-get install git -y
# Above will install the git package in the ubuntu image
# git will be used to clone the code from the git repository

WORKDIR /home/app
# Above will set the working directory to /home/app

COPY main.sh main.sh
# Above will copy the main.sh file from the build-server directory to the /home/app directory in the ubuntu image

COPY script.js script.js
# Above will copy the script.js file from the build-server directory to the /home/app directory in the ubuntu image

COPY package*.json .
# Above will copy the package.json and package-lock.json files from the build-server directory to the /home/app directory in the ubuntu image

RUN npm install
RUN chmod +x main.sh
# Above will install the nodejs packages and set the main.sh file as executable
RUN chmod +x script.js
# Above will set the script.js file as executable
# RUN sed -i 's/\r$//' main.sh
# use above line when working on windows and want to execute shell file in the container having base image ubuntu
ENTRYPOINT [ "/home/app/main.sh" ]
# Above will set the entrypoint of the docker image to /home/app/main.sh
# main.sh will be used to clone the code from the git repository and run the build and test commands
Note: If you are you using windows please use following command after copy command of the main.sh file, in Dockerfile.
RUN sed -i 's/\r$//' main.shHere's what the command does:
sis the substitute command.
\ris a carriage return character. In Windows, lines in text files end with a carriage return and a newline (\r\n), while in Unix/Linux they end with just a newline (\n).
$is the end of a line.
//means replace with nothing.So,
s/\r$//means "replace the carriage return at the end of a line with nothing".In short : This converts line endings directly within the Docker image build process to convert the code from CRLF (Windows) line endings to LF (Unix) line endings.
Other wise you will get to see the following error

Whenever the container is up all the things mentioned in the Dockerfile will be installed. And it will take /home/app/main.sh as the entry point and main.sh, will execute automatically as it's the entrypoint.
main.sh
This shell script will take the GitHub repository URL that you have provided before spinning up the container (as a task). Then it will export the git repository url to the environment variable. Then it will clone the repository to the output folder which is in the container.
And after completion of cloning the script.js file will be start executing.
#!/bin/bash

export GIT_REPOSITORY_URL="$GIT_REPOSITORY_URL"
# It'll export the git repository url to the environment variable

git clone $GIT_REPOSITORY_URL /home/app/output
# Above code will clone the repository to the output folder

exec node script.js
# It'll execute the script.js file
Script.js
This script.js will start executing the init as it's called in the last. And it'll do the process to build the project (react.js project), step by step. After building the project, the dist directory will be created.
The content of dist directory will be static files -> index.html, style.css, main.js, etc. Now we will upload these to the S3 bucket.
const { exec } = require("child_process");
// exec will be used to run the any type of command

const path = require("path");
// Above is the path module, which is used to work with file and directory paths

const fs = require("fs");

const mime = require("mime-types");
// It is used to get the MIME type of a file, which is required to upload files to S3

const { S3Client, PutObjectCommand } = require("@aws-sdk/client-s3");
// Above is the AWS SDK for JavaScript v3, which is used to interact with S3
// s3Client is used to interact with the S3 bucket
// PutObjectCommand is used to upload files to the S3 bucket

const s3Client = new S3Client({
  region: "", //us-west-1
  credentials: {
    accessKeyId: "", //process.env.AWS_ACCESS_KEY_ID
    secretAccessKey: "", //process.env.AWS_SECRET_ACCESS_KEY
  },
});

const PROJECT_ID = process.env.PROJECT_ID;
// The above is the project ID, which is passed as an environment variable

async function init() {
  console.log("Executing script.js");
  // The output folder is where the build will happen as shown in above logs

  const outDirPath = path.join(__dirname, "output");
  // Above code will create the output folder if it doesn't exist

  const p = exec(`cd ${outDirPath} && npm install && npm run build`);
  // Run npm install and npm run build in the output folder
  // on performing npm run build it'll generate a dist

  p.stdout.on("data", function (data) {
    console.log(data.toString());
  });
  // It'll print the output of the build process

  p.stdout.on("error", function (data) {
    console.error("Error: ", data.toString());
  });
  // It'll print the error if there is any

  p.on("close", async function () {
    console.log(`Build complete `);
    // After the build is complete, it'll shown in logs

    const distFolderPath = path.join(__dirname, "output", "dist");
    // Get all the files in the dist folder like -> index.html, main.js, style.css etc.

    const distFolderContents = fs.readdirSync(distFolderPath, {
      recursive: true,
    });
    // Go through the files inside the dest directory and get the content in the form of the array

    for (const file of distFolderContents) {
      const filePath = path.join(distFolderPath, file);
      if (fs.lstatSync(filePath).isDirectory()) continue;
      // above code will check if the file is a directory or not
      // if it is a directory then it'll continue to the next file in the loop

      console.log("Uploading file: ", filePath);
      // Upload to S3 bucket here the files that are in the dist folder
      //usin aws s3 v3 sdk
      // AWS SDKforJavaScript v3

      const command = new PutObjectCommand({
        Bucket: "bucket-name",
        Key: `__outputs/${PROJECT_ID}/${file}`, // on which path we are storing the file
        Body: fs.createReadStream(filePath), //by file path we are reading the file
        ContentType: mime.lookup(filePath) //by file path we are getting the type of the file
      });
      await s3Client.send(command); // Above code will send the file to the S3 bucket

      console.log("Uploading file: ", filePath);
    }

    // After the files are uploaded, we'll delete the output folder
    console.log("🚀 Good to go...");
  });
}

init();
S3 bucket (Simple Storage Service)
Create an S3 bucket which should be publicly accessible, from your AWS Console, and fill up the information of S3 in command, variable.
Give a name to your S3 bucket, and leave all the information filled as it's. Only change to make is that make the bucket public as given below.

Still, it's not publicly accessible, to make it like that anyone can read bucket content. Go to the Amazon S3 -> Buckets -> <Bucket_name>->Permissions -> Bucket policy, Edit it. You can make your policy or use the following template.
{
    "Version":"2012-10-17",
    "Statement" :[
        {
            "Effect" : "Allow",
            "Principal" : "*",
            "Action": "s3:GetObject",
            "Resource": "<Bucket arn>/*"
        },
        {
            "Sid":"AllowWebAccess",
            "Effect": "Allow",
            "Principal" : "*",
            "Action": "s3:GetObject",
            "Resource": "<Bucket arn>/*"
        }
    ]
}
AWS SDK for JavaScript v3
To interact with S3 what we are going to use AWS SDK for JavaScript v3 for More Info about this SDK Click Me.
Now we'll initialize the package.json and install the package @aws-sdk/client-s3 to interact with the AWS S3 bucket.
cd build-server
npm init -y
npm i @aws-sdk/client-s3
npm i mime-types
This following code which is a part of the script.js will put the static files to the S3 bucket.
const command = new PutObjectCommand({
        Bucket: "bucket-name",
        Key: `__outputs/${PROJECT_ID}/${file}`, // on which path we are storing the file
        Body: fs.createReadStream(filePath), //by file path we are reading the file
        ContentType: mime.lookup(filePath) //by file path we are getting the type of the file
      });
      await s3Client.send(command);
ECR (Elastic container Registry) :
- The AWS ECR is simply like Docker, Azure Container Registry, Red Hat Quay, and Sonatype Nexus Repository.
Pushing the container image to the AWS ECR (Elastic Container Registry)
In simpler it's Github for Container Images.
Steps:-
Create a Repository on the AWS ECR, go to the
Amazon ECR->Private registry->Repositories->Create repository.Give the name of the repository, keep rest by default and click on
create.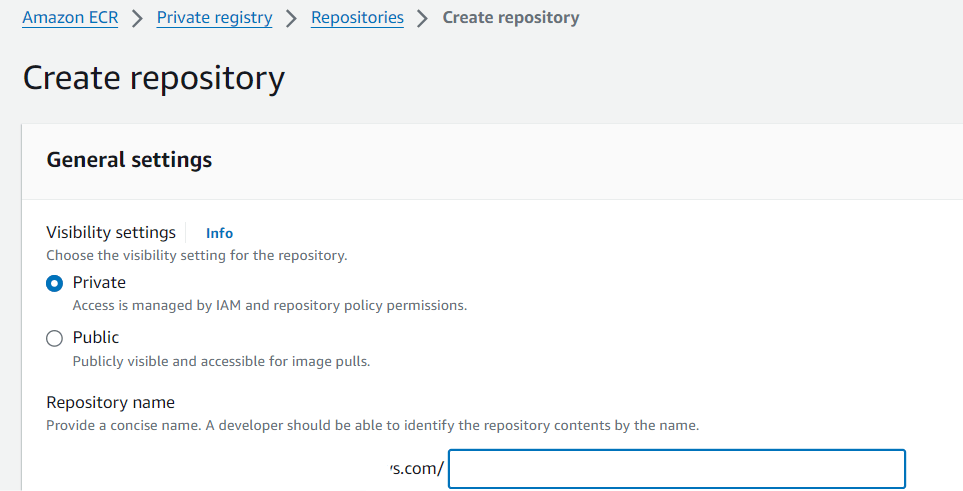
Click to the
View push commandbutton inAWS ECRwhich is created, copy the first command, and execute it. For interactive login.On getting Errors : After executing the above commands
if you get the error like this "UnrecognizedClientException error when authenticating on aws-cli"
Sol :- Run the powershell as Admin and execute the follwing command.
aws configure
Provide the info of the IAM user, by which you will be interacting, and you will login successfully.
If you get error like this
An error occurred (AccessDeniedException) when calling the GetAuthorizationToken operation: User: arn:aws:iam::ACCOUNT_NUMBER:user/MY_USER is not authorized to perform: ecr:GetAuthorizationToken on resource: *sol :- Give the Admin aceess permission to your IAM user from the AWS console.
Sometime you may forget to start the Docker -> so start it.
Again execute the command you'll get
Login Succeededin from the console. Now you are good to go.Then copy all the commands step by step. After successfully executing all those command the image will be pushed to the AWS ECR.
ECS
An AWS service that helps organizations deploy, manage, and scale containerized applications.
Creating an AWS ECS cluster which will help in spining-up (or running) the build-server container, which is on the ECR.
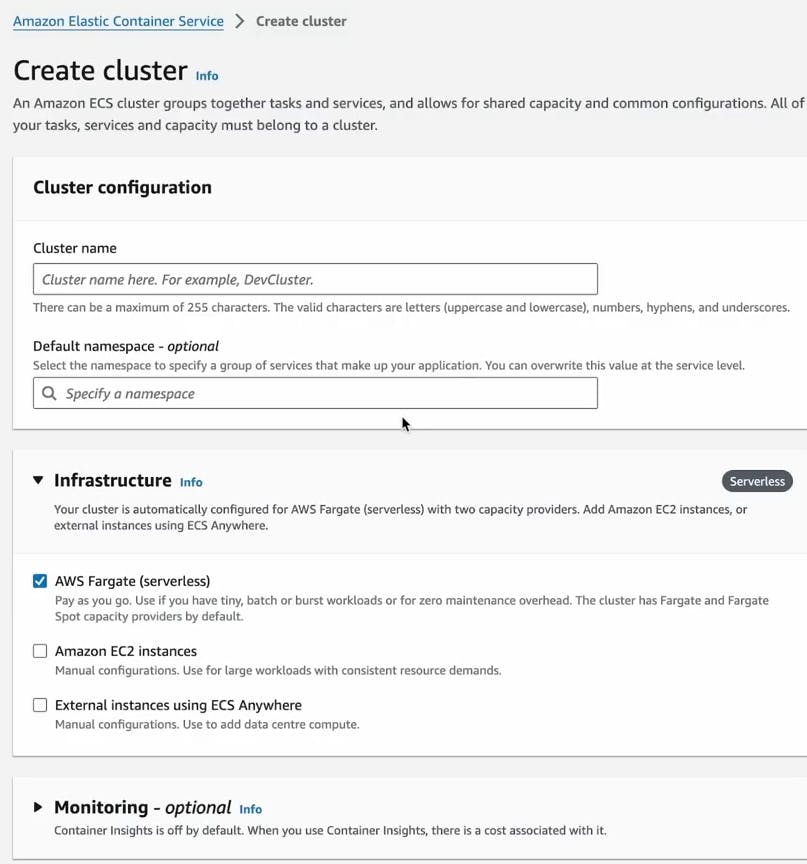
Step1 :Amazon Elastic Container Service -> Create cluster
Step2 : Give the name of the cluster.
Step3 : Choose the Infrastrucure as - AWS Fargate
Why AWS Fargate ?
-To run containerized applications without managing the underlying infrastructure.
Step3 :- Click on Create button and your cluster is ready.
So now we have to connect the ECS to ECR, which contains container image of build-server.
TASK
A task definition is a blueprint for an application that describes how a Docker container should launch
And to spin-up the container we have to create it, and then we will provide environmental variables like:- Github_URL and Project_id, which will be required to cloning, and building the project.
Creating Task
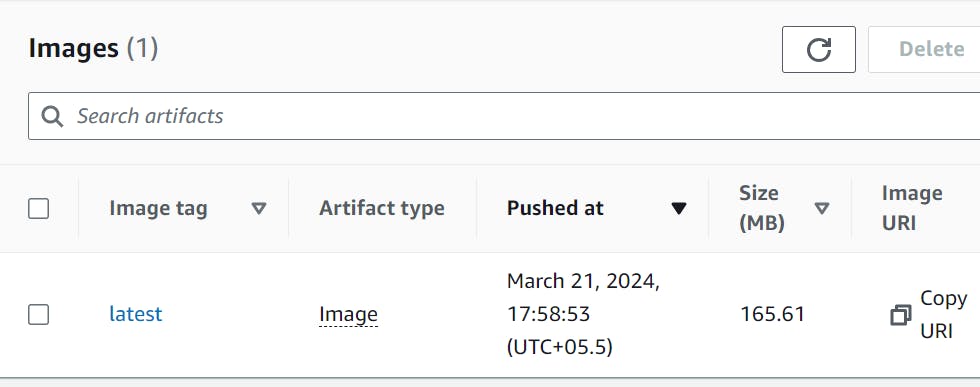
Step1 : Go to the ECR registry and you'll find the image of the container that you pushed.
Step2 : Copy the URI of the Image.

Step3 : Go to the Amazon Elastic Container Service -> Task definitions and click on Create Task button. A new interface will open like this. Give the task-name.
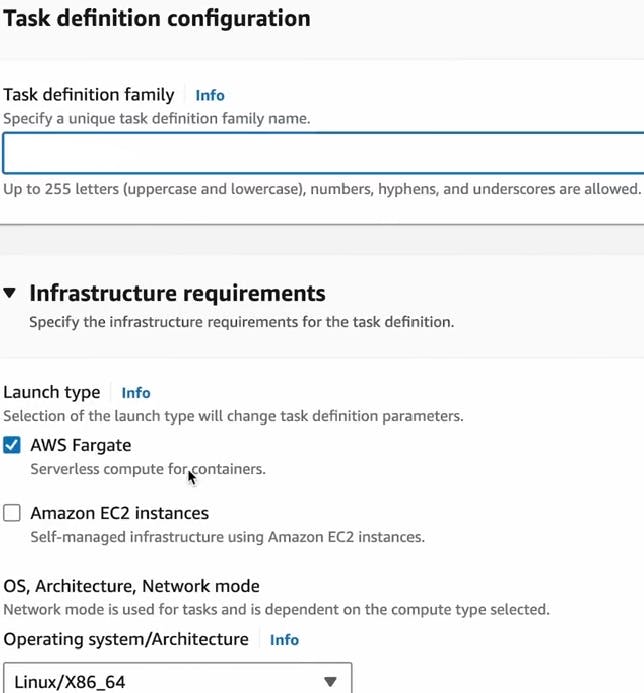
Step4 : Paste the URI of the Image as shown below. Give a name of the Image. Delete the port mapping of the container as we are not exposing any port.

Step5 : Click on the Create Task button at the end. And your Task is created.
But our task is not completed 😅, we have to
Running Task
Step1 : Go to the Amazon Elastic Container Service -> Clusters -> your-cluster-name > Run task. In the Compute options select as Launch type, then select FARGATE as Launch Type.
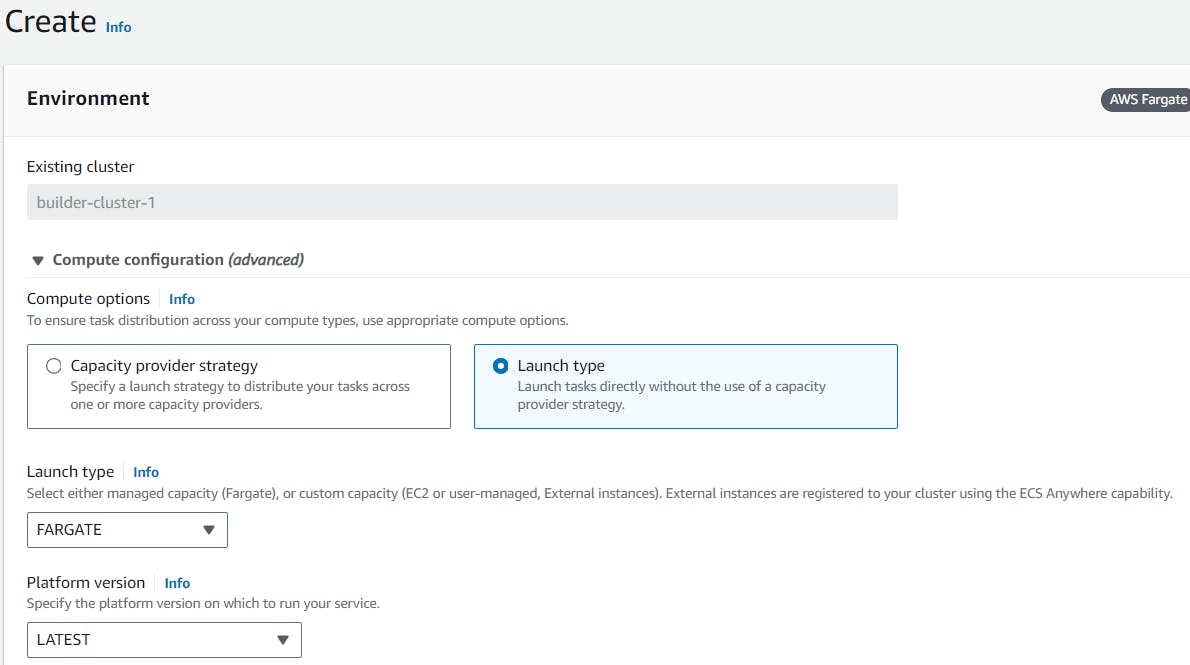
Step2 : In the Deployment configuration. Select Application type as Task. Then choose your-task-name in the Family.

Step4 : Give the Environment variable name and their respective value in the container overrides.
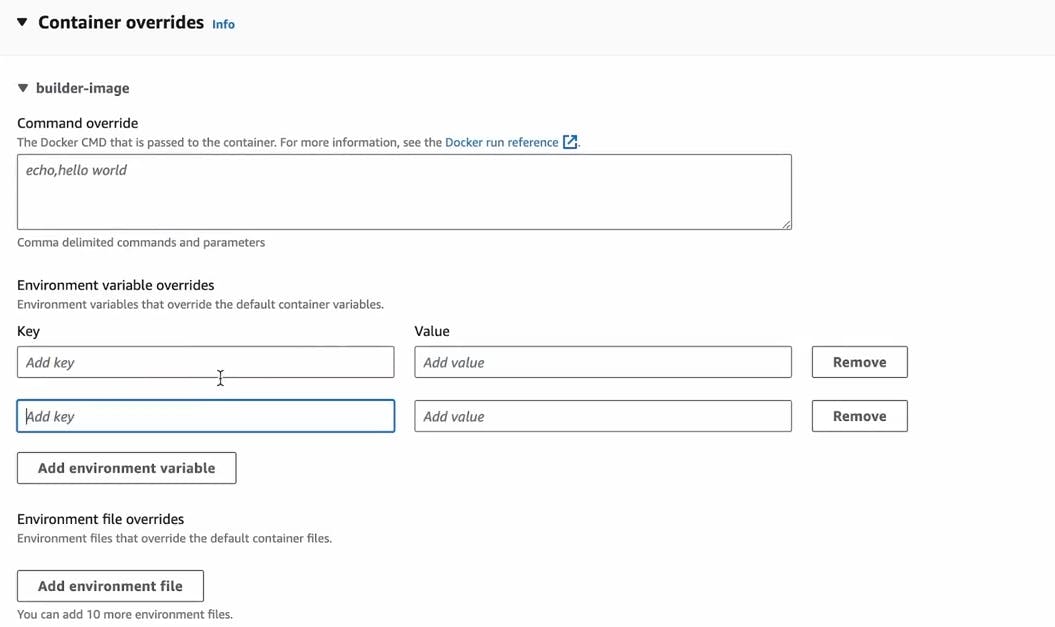
Step5 : Click on create button to run task.
And you can see the logs that, I was talking about in the starting in the logs of the running task.

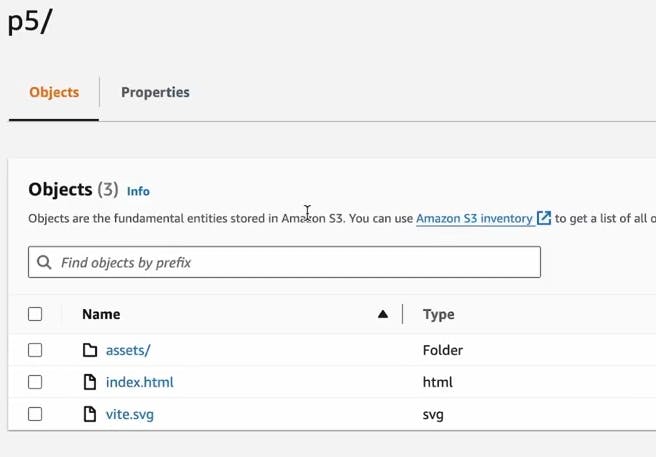
So now If you go in the S3 bucket and PROJECT_ID, you will see the static files.
Reverse Proxy
Reverse proxy is an essential component of web application infrastructure, providing a layer of abstraction between clients and origin servers to help optimize traffic routing and improve performance and security. They can improve a website's speed, security, reliability, and efficiency.
All the requests like http://a1.localhost:8000 will go to the Reverse Proxy. Reverse proxy itself running on the port 8000. It will map to __outputs/{project_id}/ to this URL. Reverse Proxy will stream back all the content (static files) present in the __outputs/{project_id}/ S3 bucket to the user (accessing the static files of each project id).

Creating reverse-proxy
We will build this with the node.js + express.js.
before that make a directory inside the project, do the following
npm init -y
npm i express
npm i http-proxy
Then make a index.js file to create a reverse proxy.
const express = require("express");
const httpProxy = require("http-proxy");
// It is the http-proxy module, which is used to create a reverse proxy server

const app = express();
const PORT = 8000;

const BASE_PATH = ""; // base URL

const proxy = httpProxy.createProxy();
// It is used to create a reverse proxy server

app.use((req, res) => {
  const hostname = req.hostname;
  // It is used to get the hostname from the request a1.localhost:8000

  const subdomain = hostname.split(".")[0];
  // It is used to get the subdomain from the hostname which is here a1

  const resolvesTo = `${BASE_PATH}/${subdomain}`;
  // It is used to get the URL to which the request will be resolved

  return proxy.web(req, res, { target: resolvesTo, changeOrigin: true });
  // It is used to resolve the request to the target URL
});

proxy.on("proxyReq", (proxyReq, req, res) => {
  const url = req.url;
  if (url === "/") proxyReq.path += "index.html";
});
// It is used to add index.html if the URL is /

app.listen(PORT, () => console.log(`Reverse Proxy Running...${PORT}`));
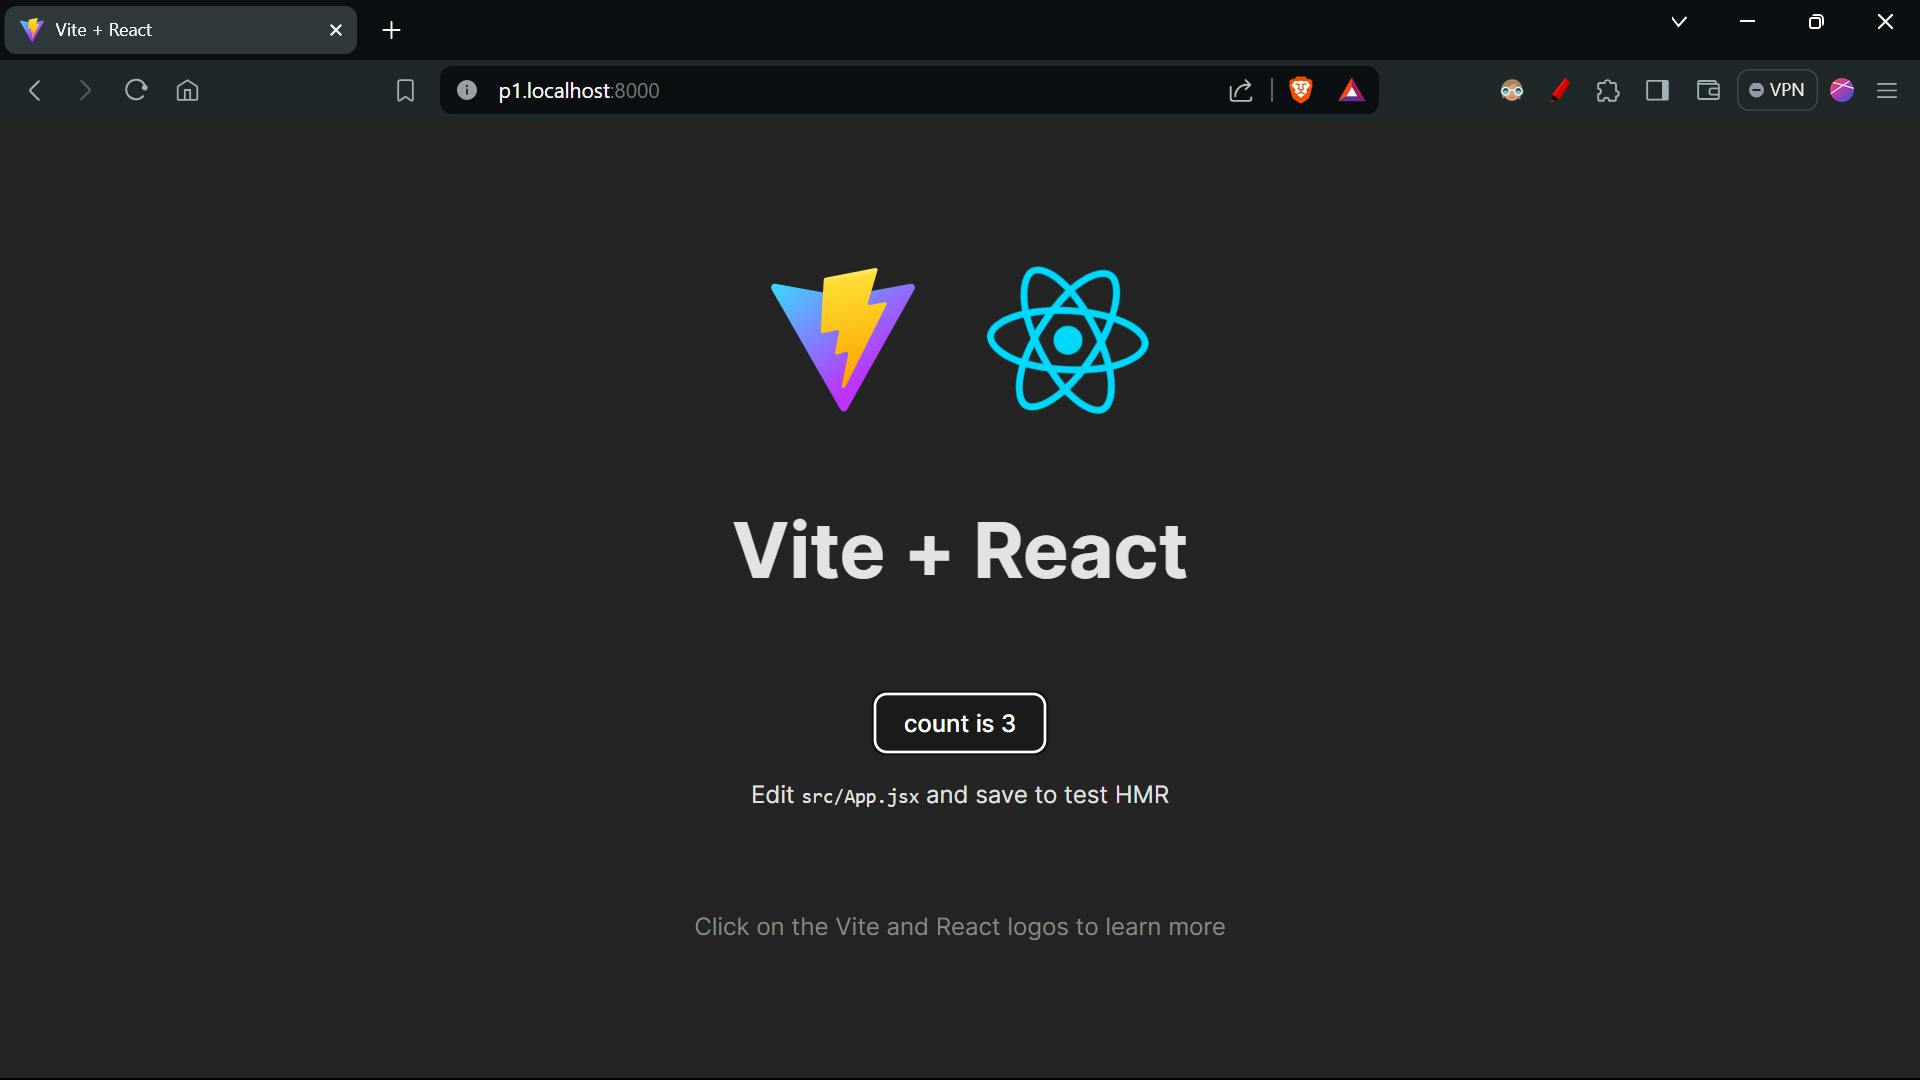
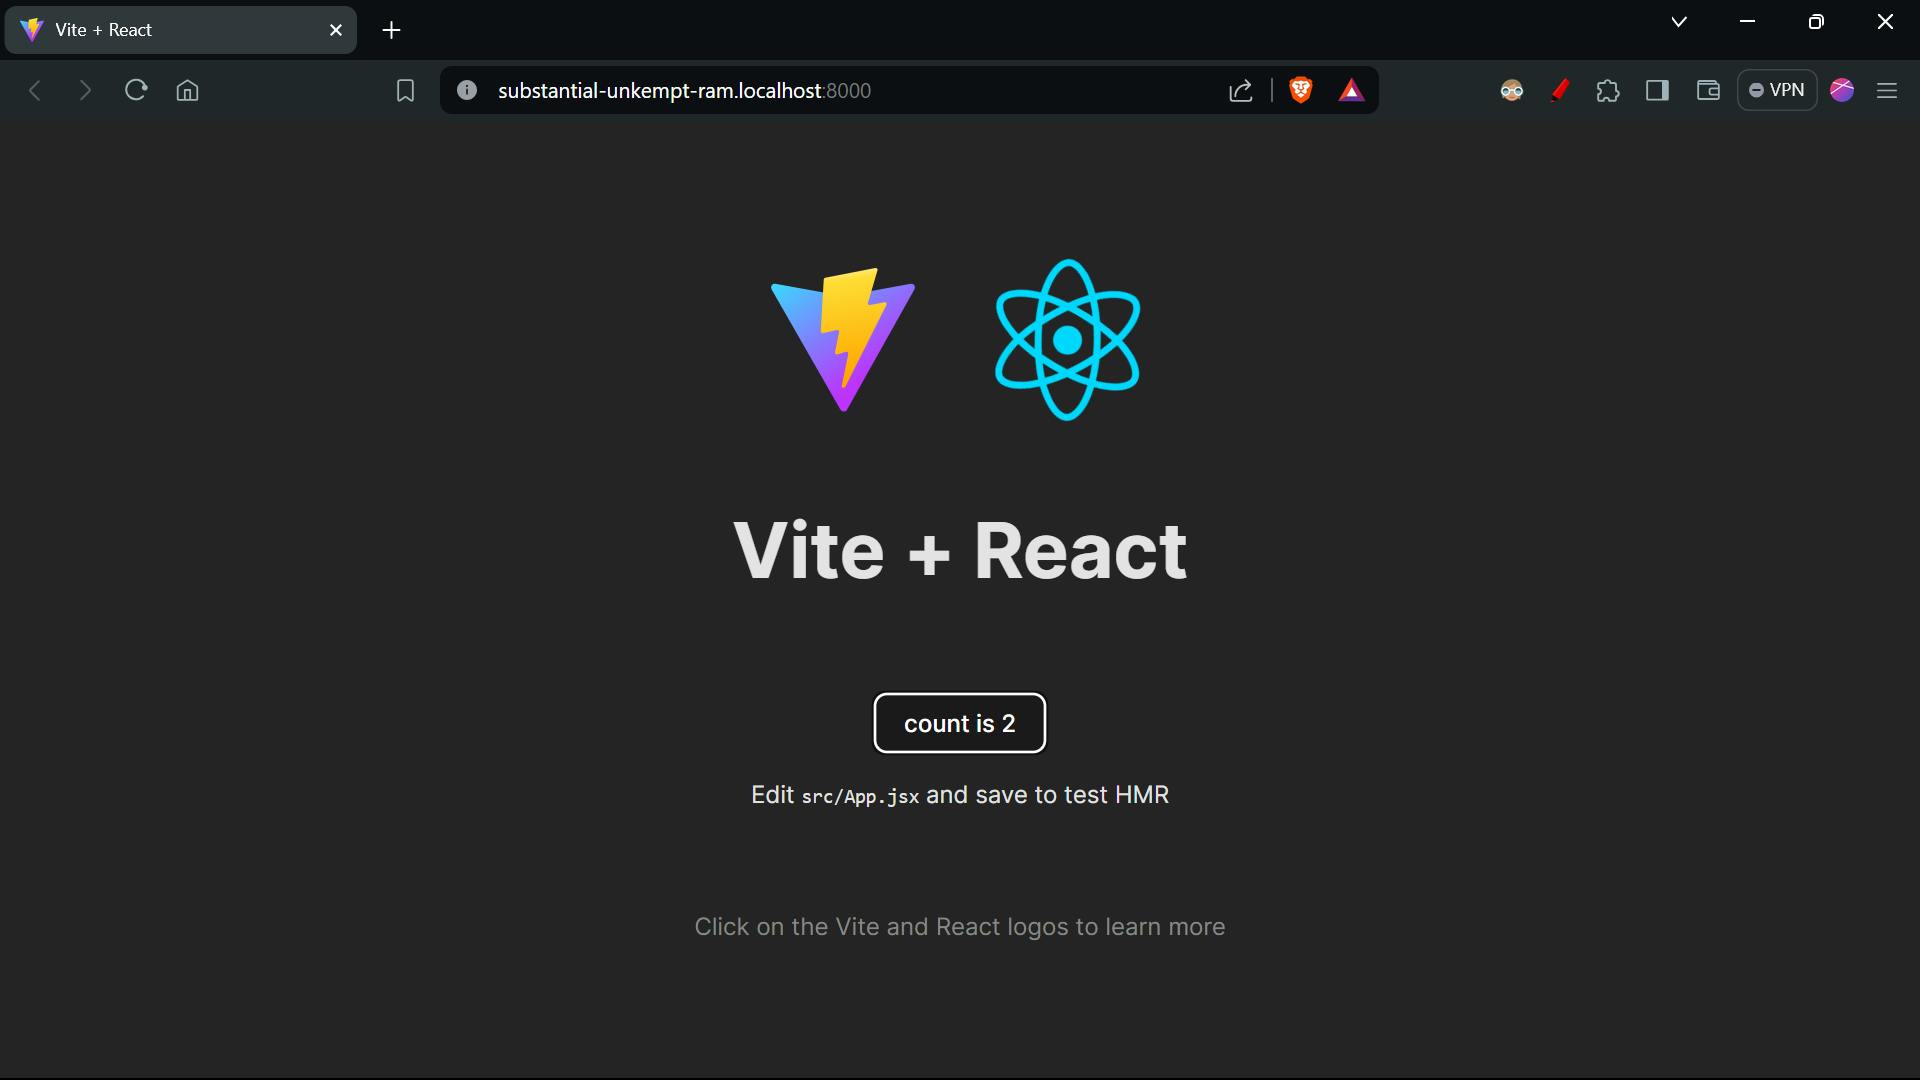
On running the reverse proxy we are able to see the application running at http://<PROJECT_ID>.localhost:8000/, which was uploaded on s3 bucket.
Our reverse-proxy is running on the port 8000.
API server
The things it'll do, what we are doing with the UI on ECS, like creating a task and running a task, in order to spin the container. In this way, we can do that all.
Then make a separate directory in the project for the API server. And do the following command.
npm init -y
npm i express
npm i @aws-sdk/client-ecs
npm i random-word-slugs
To spin the container through API call we'll need a client to interact with AWS ECS. So we use AWS SDK for JavaScript v3 to know more about Click Me
Then make the index.js file to run the API server to interact with the Container. we will use two objects of it ECSClient, RunTaskCommand which will be used to interact with the ESC and run the task.
In the ECS > create task > Network section
Below the input container, the subnets will be provided copy it and paste in the code, as the value of the array ['subnets1', 'subnets2', 'subnets2'].

The Security group name will be provided below the input box copy it and paste as the value for the securityGroups: ['value'].

The following will be the code for making the API Server.
const express = require('express')
const { generateSlug } = require('random-word-slugs')
// Above code is used to generate a random word for the project
// slug means a unique identifier for the project
const { ECSClient, RunTaskCommand } = require('@aws-sdk/client-ecs')
// Above code is used to interact with the ECS service
const app = express()
const PORT = 9000
const ecsClient = new ECSClient({
region: '',
credentials: {
accessKeyId: '',
secretAccessKey: ''
}
})
// Above code is used to create an ECS client
const config = {
CLUSTER: '',
TASK: ''
}
// Above code is used to store the ECS cluster and task details
app.use(express.json())
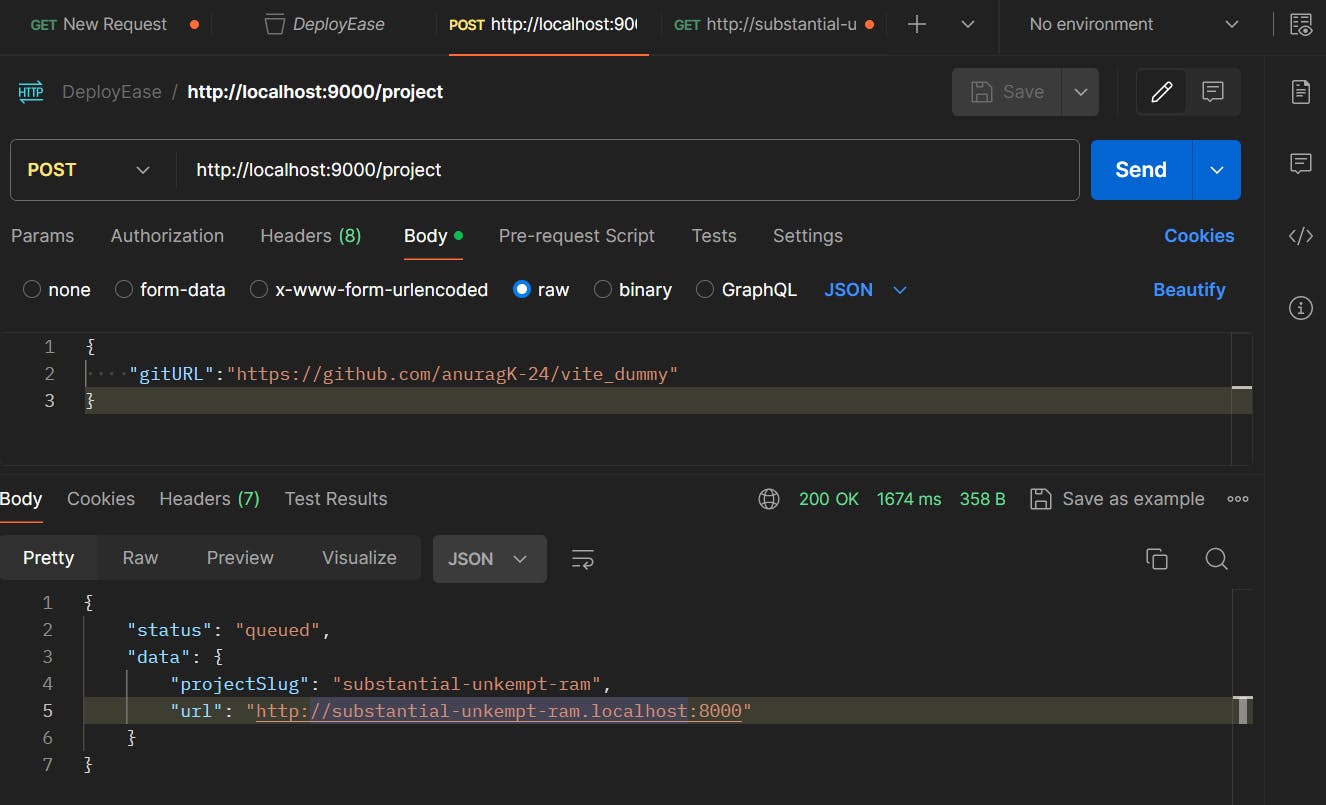
app.post('/project', async (req, res) => {
const { gitURL, slug } = req.body
const projectSlug = slug ? slug : generateSlug()
// Above code is used to generate a random slug if the slug is not provided
// Spin the container throught the api call
const command = new RunTaskCommand({
cluster: config.CLUSTER,
taskDefinition: config.TASK,
launchType: 'FARGATE',
count: 1,
networkConfiguration: {
awsvpcConfiguration: {
assignPublicIp: 'ENABLED',
subnets: ['', '', ''],
securityGroups: ['']
}
},
overrides: {
containerOverrides: [
{
name: 'your-image-name',
environment: [
{ name: 'GIT_REPOSITORY__URL', value: gitURL },
{ name: 'PROJECT_ID', value: projectSlug }
]
}
]
}
})
// Above code is used to create a RunTaskCommand object with the required parameters
// The command will spin a container with the specified task definition and environment variables
await ecsClient.send(command);
// Above code is used to send the command to the ECS service
return res.json({ status: 'queued', data: { projectSlug, url: `http://${projectSlug}.localhost:8000` } })
// Above code is used to return the project slug and the URL to access the project
})
app.listen(PORT, () => console.log(`API Server Running..${PORT}`))
Run the both api-server and reverse-proxy which will be running at port 9000 and 8000 respectively.
And if you will check inside the cluster you'll find out that a task is running. By this we we achieved successfully how to interact through Express, application.
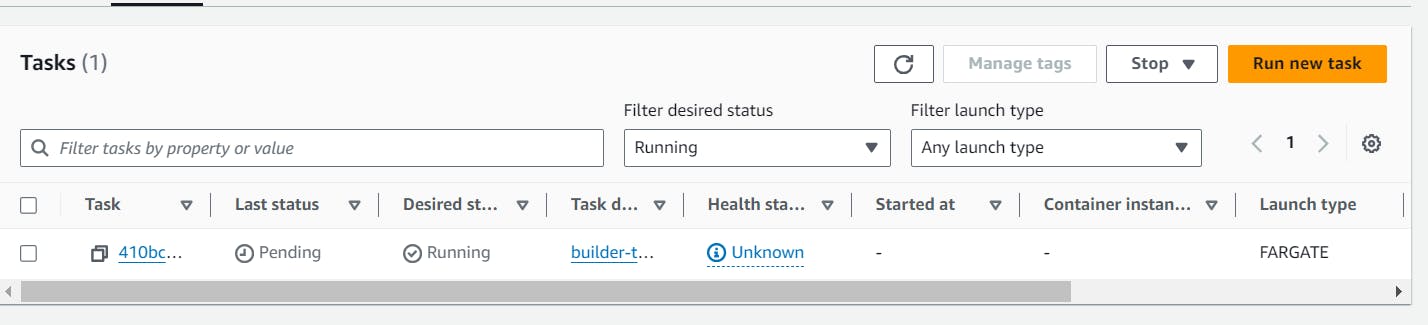
Wait for some time to execute task completely, and when it executed completely go to the s3 bucket and check if the new object is uploaded.

As here we can see that substantial-unkempt-ram slug is generated and by that name static file uploaded on the bucket.

And by reverse proxy we are able to run the project on the http://substantial-unkempt-ram.localhost:8000/ , if you are thinking about how's it deployed link as it have localhost:8000 in the URL. So it's because reverse proxy itself running on the port 8000, that's why.
If the reverse proxy deployed on the deployfy.com, then the link of the deployed website will be in this form http://substantial-unkempt-ram .deployfy.com/ .
as you can see below.
And now we can simply join this express backend to a frontend and you are good to go.
You can call the API server via any client application providing the information along it. You will be able to deploy the react.js or express.js application website you want.

If you want to deploy a different application rather than both react.js or express.js application, you can simply do the changes in Dockerfile and change the steps in the script.js to initialized and successfully run the cloned project and you are good to go.
Thank you for reading this blog, It contains lots of stuff but i tried my best to simplify each and every step to understand easily.
If you like this blog, please do like it.
Check out my Portfolio website for connecting with me or just to say Hi !!.